Click on the image for truth size
Neede:
3 photographs (1 big photo min 450 pixels high)
Paint Brush:
Blokjes brush
Tubes:
Kruissteek tube
Schroef tube
Font:
Inspiration 0 font
plugins:
Unlimited 2.0
Download material
1. Open the photo’s and tubes in psp
2. Go to the materials palette and set foreground color on #ffffc0 and
backgrouncolor on #f9dd58
3. Go to your big photo
4. Activate freehand selection – free hand – tolerance 0 - feather 55
Select the dog or person
5. Selections - invert
Press now on delete on your keyboard
6. Edit - copy
7. Open a new image 600 x 600 pixels transparent
8. Activate flood fill tool and fill the image with foreground color
9. Edit - paste - paste as a new layer
10. Activate move tool and move the photograph on the correct spot
(see example)
11. Effects – plugins – Unlimited 2.0 – Special effects –
watercolor – Fade 136
12. Go to the layer palette and set opacity on 70
13. Go now to one of your other photograph
14. Image – resize – 201 pixels high
15. Image – add borders – 5 pixels white
16. Edit - copy
17. Return to your image
Edit - paste - paste as a new layer
18. Activate move tool and move the photograph on the correct spot
(see example)
19. Repats Point 14 till 18 with your other photograph
20. Go to the steekkruis tube,
Edit - copy
21. Return to your image
Edit - paste - paste as a new layer
22. Activate move tool and move the photograph on the correct spot
(see example)
23. Layers – duplicate
24. Drawer the copy beside the orginele
25. Layers – duplicate
26. Drawer the copy beside the orginele
27. 2 times, layers-merge-merge down
28. Effects – 3d effects – dropshadow
horizontal and vertical 1 – opacity 50 – blur 3 – black
29. Go to the layer palette and make raster 1 active
30. Layers – new raster layer
31. Activate paint brush - blokje brush - size 300
32. Click now random with your right mouse button a number of time over the complete image
33. Activate eraser tool (size 60 and hardness 73) and erase the blokjes brush which stands on your big photograph
34. Layers - merge - merge visible
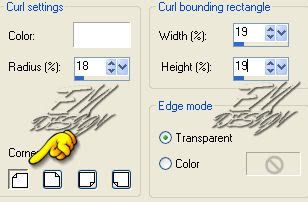
35. Effects – image effects – page curl,

36. Activat selection tool, rectangle, feather 0 and
pull square left in above angle

37. Layers – new raster layer
38. Activate flood fill tool and fill the selection with background color
39. Selections – Select none
40. Layers - arrange - send to bottom
41. Layers – new raster layer
42. Activate flood fill tool and fill the selection with foreground color
43. Layers - arrange - send to bottom
44. Go to the schroef tube
Edit - copy
45. Return to your image
Edit - paste - paste as a new layer
46. Layers - arrange - bring to top
47. Activate movetool and move the tube to the left above angle
48. Activate text tool - font: insparation – size differs by name
49. Go to the material palette and set foreground color on #f9dd58
(same color as background color)
50. Type the text
51. Effects – 3d effects – dropshadow (click on the question on ok)
Horizontal and vertical 1 – opacity 100 – blur 0 – black
52. Layers – new raster layer and place on this your water mark
We are very curious to your development of this tutorial.
This lesson cannot without authorisation of EM design on another
forum or website' s be placed. This lesson has been made on
29 june 2008 A type equal lesson relies purely on contingency


Geen opmerkingen:
Een reactie posten