
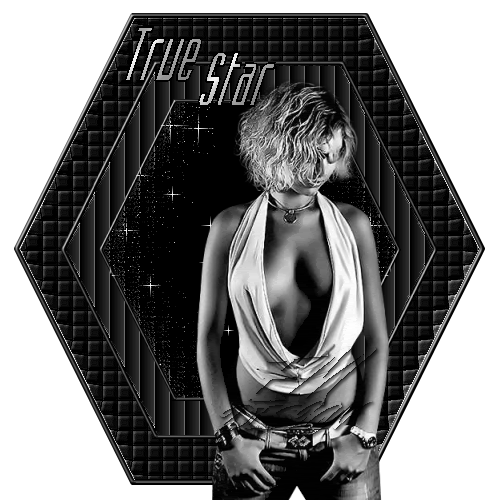
Click on the image for truth size
Needed:
Tube maximum 425 pixels high
preset shape:
Basic shape
Pattern:
zilver
Plugins:
VM Natural
Download matrials
1. Open de tube in psp
2. Open a new image 500 X 500 pixels transparent.
3. Take with your piped a foreground color from your tube and
close the background color (click on the circle)

4. Go to the preset shape tool - hexagon
Mark Anti alias and create as vector - width 5
5. Pull the preset shape from left above angle to the right under angle
6. Layers - convert to rasterlayer
7. Effects - 3D effects - inner bevel
Preset metallic

8. Activate magic tool, tolerance and feater 0 and select the insite of the
hexagon
9. Activate flood fill tool and fill the selection with foreground color
10. Press two time on shift-d on your keyboard for two kopie' s of your image
11. Return now to your original image
12. Effects - texture effects - tiles

13. Effects - edge effects - enhance
14. Selections - select none
15. Go now to one of the copies
16. Image - resize - 80 precent
Mark resize all layers
17. Efects - texture effects - blinds
wifth 15 - opacity 20 - mark light from left/top - color white
18. Effects - edge effects - enhance
19. Selections - select none
20. Edit - copy
21. Return to the original image
Edit - paste - paste as a new layer
22. Go to your second copy of your image,
23. Image - resize - 80 persent; do this total two times
Mark resize all layers
24. effects - texture effects - mosaic glass

25. Selection - select none
26. Edit - copy
27. Return to the original image
Edit - paste - paste as a new layer
21. Layers - duplicate, repeat this three times
22. Go to your tube,
Edit - copy
24. Return to the original image
Edit - paste - paste as a new layer
25. Activate Move tool and move the tube on the correct spot
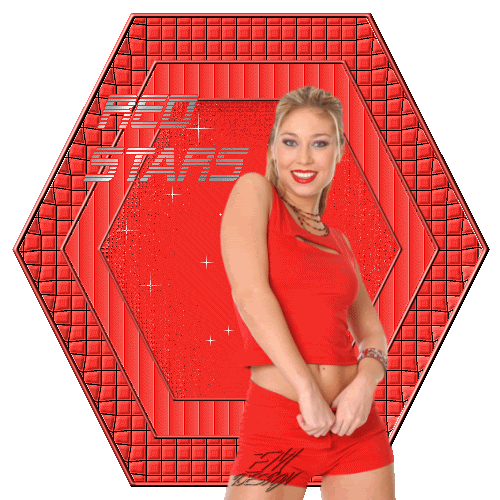
see example
26. Layers - new raster layer, place on this your water mark
27. Go to the layer palette, close copy of raster 4, copy (2) op raster 4 and copy (3) of raster 4 by clicking on the eye. Make raster 4 active
28. Effects - plugins - VM Natural - sparkles.
Play with the setting, I have started it upper putting drawer on twenty-eight.
29. Go to the layer palette and close raster 4 and open copy of raster 4 by clicking on the eye.
30. Effects - plugins - VM Natural - sparkles
Change the setting of the upper drawer
31. Repeat point 29 and 30 by copy (2) of raster 4 and copy (3) of raster 4.
32. Make the upper layer active
33. Go to the materials palette and open background color and change
it to Zilver pattern angle 359 and scale 129
34. Activate text tool - search a nice font stroke width 1,00 and create as vector
35. Type your tekst
Layers - convert to rasterlayer
36. Activate move tool and move the text on the correct spot
37. Go to the layer palette and close copy (3) of raster 4 and open raster 4 by clicking on the eye
38. Edit - copy merge
39. Open now Animation Shop
Edit - paste - as new animation
40. Return to psp and go to the layer palette.
Close raster 4 and open copy of raster 4
41. Edit - copy merge
42. return to Animation Shop.
Edit - paste - after current frame
43. Return to psp and go to the layer palette.
Close copy of raster 4 and open copy (2) of raster 4
44. Edit - copy merge
45. return to Animation Shop.
Edit - paste - after current frame
46. Return to psp and go to the layer palette.
Close copy of raster 4 and open copy (3) of raster 4
47. Edit - copy merge
48. return to Animation Shop.
Edit - paste - after current frame
save and ready is True Stars
We are very curious to your development of this tutorial.
This lesson cannot without authorisation of EM design on another
forum or website' s be placed. This lesson has been made on
31 october 2006 A type equal lesson relies purely on contingency


Geen opmerkingen:
Een reactie posten