skip to main |
skip to sidebar
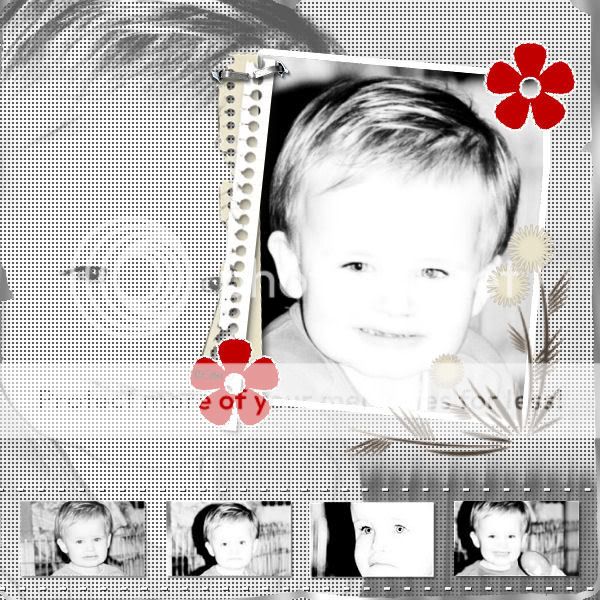
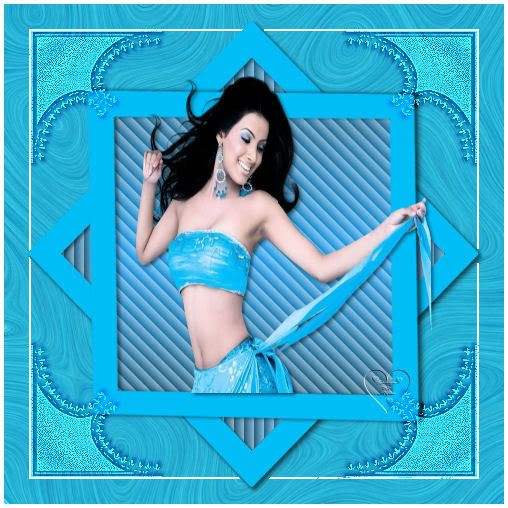
Onze 86e tube!

Download Hier
Please leave your comments.
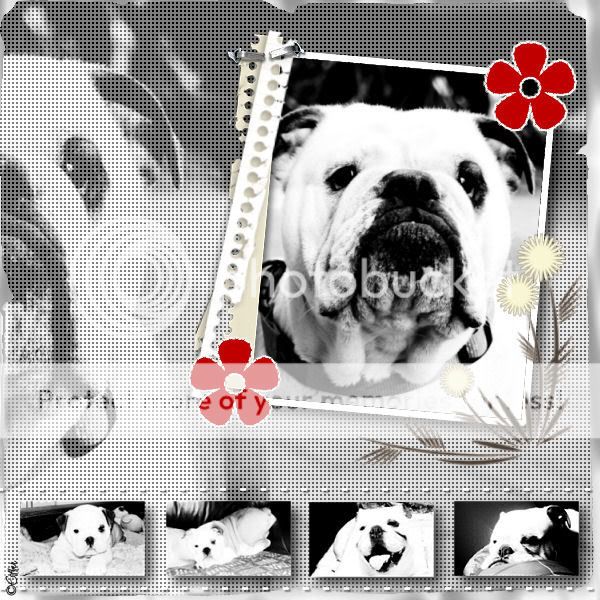
Onze 83e tube!

Download Hier
Please leave your comments.
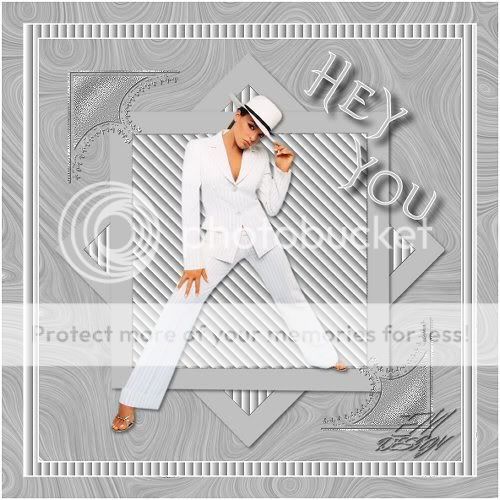
Click on the image for truth size
Needed:
5 Photo's
Tube's:
Papierrandje 1
Papierrandje 2
Nietje
Achtergrond papiertje
Plugins:
Unlimited 2.0
Filter Factory A
Template 14 made by Yvette Design
(Yvette thank that we can use these template)
Template Downloaden
Materials Downloaden
1. Open the template, tubes en photos in psp
2. Go to the first photo
Effects – plugins – unlimited 2.0 - color filters - grayscale
128 – 128 -128
3. Repeat point 2 with all photograph, you can also use Adobe Photoshop lightroom (below to see your Kate winslet version which has been made with Unlimited 2.0)
4. Go to the template,
Window - duplicate or shift–D
5. Close the original template
6. Go to the copy of the template,
Image - resize – 600 pixels
(Unmark resize all layers)
7. Layers - delete
8. Go to the layers palette and make achtergrond layer active
(bottom layer)
9. Go to the photograph which you wants to use for the background,
Edit - copy
10. Return to the template,
Edit - paste - paste as a new layer
11. If necessary, resize the photograph with small steps of 80 percent
12. Activate move tool and move the photograph against the right-hand side
13. Layers - duplicate
14. Activate move tool and move the photograph something to the left
15. Repeat point 13 and 14, repeat these points till the photograph stands beautiful at the left-hand side.

16. Layers - merge - merge down
Repeat this, to all photograph standing on one layer
17. Effects - texture effects - weave

18. Go to the layer palette and make Big Photo layer active
19. Selections – Select all
20. Selections - float
21. Selections - defloat
22. Edit - paste - paste as a new layer
(background photograph still in the memory)
23. Edit - resize – 80 percent
Repeat this till the photograph has the correct size
24. Selection - invert
Press on delete on your keyboard
25. Selections - select none
26. Go to the layer palette and activate Big Photo layer
Layers - delete
27. Repeat point 26 also with Ribbon 1 layer and Ribbon 2 layer
28. Go back to to the layer palette and activate Small Photo 1 layer
29. Selections – Select all
30. Selections - float
31. Selections - defloat
32. Go to your second photograph
Edit – copy
33. Edit - paste - paste as a new layer
If it is necessary resize the photograph
34. Activate move tool and move the photograph in the selection
35. Selections - invert
Press on delete on your keyboard
36. Selections - select none
37. Adjust - sharpness - sharpen
38. Effects – 3d effects – drop shadow
horizontal and vertical 2 – opacity 40 – blur 2 – black
39. Go to the layer palette and delete Small photo 1 layer
and activate Small photo layer 2
40. Selections – Select all
41. Selections - float
42. Selections - defloat
43. Go to the third photograph
Edit - copy
44. Edit - paste - paste as a new layer
If it is necessary resize the photograph
45. Activate move tool and move the photograph in the selection
46. Selections - invert
Press on delete on your keyboard
47. Selections - select none
48. Adjust - sharpness - sharpen
49. Effects – 3d effects – drop shadow
horizontal and vertical 2 – opacity 40 – blur 2 – black
50. Go to the layer palette and delete Small photo 2 layer
and activate Small photo layer 3
51. Repeat points 40 till 50 with the layers Small Photo 3 and Small Photo 4
52. Go to the layer palette and activate Raster 2
53. Selections – Select all
54. Selections - float
55. Selections - defloat
56. Selections - modify - select selections borders – outside – 7 – Mark anti alias
57. Layer - new raster layer
58. Activate flood fill tool and fill the border with White
59. Selections - select none
60. Layers - merge - merge down
61. Go to the layer palette and activate Stitches 1 layer
62. Selections – Select all
63. Selections - float
64. Selections - defloat
65. Selections - modify - expand - 1 pixel
66. Layers - new raster layer
67. Activate flood fill tool and fill the selection with White
68. Selections - select none
69. Effects - 3d effects - drop shadow
horizontal and vertical 1 – opacity 80 – blur 1 – black
70. Go to the layer palette and delete Stiches 1 layer
and activate Stiches 2 layer
71. Selections – Select all
72. Selections - float
73. Selections - defloat
74. Selections - modify - expand - 1 pixel
75. Layers - new raster layer
76. Activate flood fill tool and fill the selection with White
77. Selections - select none
78. Effects - 3d effects - drop shadow
horizontal and vertical 1 – opacity 80 – blur 1 – black
79. Go to the layer palette and delete Stiches 2 layer and
activate raster 2 (Big photo)
80. Go to papierrandje 1 tube,
Edit - copy
81. Return to the template,
Edit - paste -paste as a new layer
82. Image - rotate - free rotate – left 6
83. Activate move tool and move the papierrandje on the angle of the photograph (see example)
84. Effects – 3d effects – drop shadow
horizontal and vertical 2 – opacity 40 – blur 2 – black
85. Go to papierrandje 2 tube,
Edit - copy
86. Return to the template,
Edit - paste -paste as a new layer
87. Image - mirror
88. Image - rotate - free rotate – right 6
89. Activate move tool and move the papierrandje on the angle of the photograph (see example)
90. Effects – 3d effects – drop shadow
horizontal and vertical 2 – opacity 40 – blur 2 – black
91. Go to the Nietje tube,
Edit - copy
92. Return to the template,
Edit - paste -paste as a new layer
93. Activate move tool and move the nietje tube (staple) on the paper edge (see example)
94. Effects – 3d effects – drop shadow
same settings
95. Activate move tool and move the Flower Doodle (flower that stands on the large photograph) on the correct spot (see example)
96. Layers - duplicate
97. Go to the layer palette aan activate FLower Doodle layer (
Maak Flower Doodle laag (original layer)
98. Effects - photo effects - sepia toning – 35
99. Go to the layer palette and activate copy of Flower Doodle
100. Selections - select all
101. Selections - float
102. Selections - defloat
103. Layers - new raster layer
104. Go to the materials palette and set foreground color on #e9e3cb
105. Activate flood fill tool and fill the selection with forground color
106. Selections - select none
107. Go to the layer palette and delete Copy of FLower Doodle layer
and activate the upper Flower Doodle layer (the beige flower doodle layer)
108. Activate eraser tool, size 38 hardness 100 and erase the de Lower part of the flower

109. Go to the layer palette and activate Flower 2 layer
110. Layers - merge - merge down
111. Selections - select all
112. Selections - float
113. Selections - defloat
114. Go to the materials palette and set foreground color on #c00000
and background color on #ffffff
115. Activate flood fill tool and fill the selection with foreground color
116. Selections - modify - expand – 2 pixels
117. Layers - new raster layer
118. Fill the selection with background color
119. Selections - select none
120. Layers - arrange - move down
121. Go to the layer palet and activate Raster 1 layer
122. Go to achtergrondpapiertje tube,
Edit - copy
123. Return to the template,
Edit - paste -paste as a new layer
124. Image - resize – 95 percent
Unmark resize all layers
125. Activate magic wand - mode: add – tolerance and feather on 0
Select the space between the paper and ousite edge
126. Go to the layer palette and activate Raster 1 layer
Press on delete on your keyboard
127. Go again to the layer palette and delete the layer with the
Achtergtrondpapiertje tube
128. Selections - select none
129. Go to the layer palette and activate Achtergrond layer and set
opacity on 65
130. Activate flood fill tool and fill the layer with background color
131. Layers - new raster layer
132. Go to the materials palette and change foreground color in #808080
133. Fill the layer with foreground color
134. Layers - arrange - send to bottom
135. Effects - plugins – filter factory A - poolshadow

136. Go to the layer palette and activate the upper layer
137. Layers - new raster layer , place on this your water mark
Save and ready is Flower Template
We are very curious to your development of this tutorial.
This lesson cannot without authorisation of EM design on another
forum or website' s be placed. This lesson has been made on
22 february 2009 A type equal lesson relies purely on contingency

Klik op de bewerking voor ware grootte
Benodigdheden:
5 foto’s
Papierrandje 1
Papierrandje 2
Nietje
Achtergrond papiertje
Template 14 is gemaakt door Yvette Design
(Yvette, bedankt dat wij deze template mogen gebruiken)
Template Downloaden
Materiaal downloaden
1. Open de template, tubes, papiertje en foto’s in psp
2. Ga naar 1 van je foto’s
Effecten – insteekfilters – unlimited 2.0 - color filters - grayscale
128 – 128 -128
3. Herhaal punt 2 met alle foto’s je kan ook Adobe Photoshop lightroom gebuiken. (onderaan zie je Kate winslet bewerking die is gemaakt met Unlimited 2.0)
4. Ga nu naar je template,
Venster – dupliceren of shift – D
5. Sluit de originele template
6. Ga nu naar je kopie template,
Afbeelding – formaat wijzigen – 600 pixels
(formaat van alle lagen wijzigen aangevinkt)
7. Lagen – verwijderen
8. Maak achtergrond laag actief in je lagen palet
(onderste laag)
9. Ga nu naar je foto, die je voor je achtergrond wilt gebruiken,
Bewerken – kopieren
10. Ga terug naar je template,
Bewerken – plakken – plakken als nieuwe laag
11. Eventueel de foto verkleinen met kleine stapje van 80%
om vervorming te verkomen
12. Activeer verplaatsingstool en schuif de foto tegen de rechterkant aan
13. Lagen – dupliceren
14. Activeer verplaatsingstool en schuif je foto iets naar links
15. Herhaal punt 13 en 14 tot dat je foto mooi uitkomt.
16. Lagen – samenvoegen – omlaag samenvoegen
Doe dit tot dat alle foto op 1 laag staan.
17. Effecten – textuur effecten – weefpatroon

18. Ga naar je lagen palet en maak Big Photo laag actief
19. Selecties – alles selecteren
20. Selecties – zwevend
21. Selecties – niet zwevend
22. Bewerken – plakken –plakken als nieuwe laag
(als het goed is staat je achtergrond foto nog in het geheugen)
23. Afbeelding – formaat wijzigen – 80 procent
Herhaal dit net zolang tot dat de foto op formaat is.
24. Selecties – omkeren
Druk op delete op je toetsenbord
25. Selecties – niets selecteren
26. Ga naar je lagen palet en klik met je rechter muis knop op
Big Photo laag en klik dan op verwijderen
27. Herhaal stap 26 ook met de lagen Ribbon 1 en Ribbon 2
28. Maak nu Small Photo 1 actief in je lagen palet
29. Selecties – alles selecteren
30. Selecties – zwevend
31. Selecties – niet zwevend
32. Ga naar de foto die je wilt gebruiken
Bewerken – kopieren
33. Bewerken – plakken - plakken als nieuwe laag
Eventueel verkleinen
34. Activeer je verplaatsingstool en schuif je foto in de selectie
35. Selecties – omkeren
Druk op delete op je toetsenbord
36. Selecties – niets selecteren
37. Aanpassen – scherpte – verscherpen
38. Effecten – 3d effecten – slagschaduw
horizontaal en verticaal 2 – dekking 40 – vervaging 2 – zwart
39. Ga naar je lagen palet en verwijder Small Photo 1 laag
En maak Small Photo 2 laag actief
40. Selecties – alles selecteren
41. Selecties – zwevend
42. Selecties – niet zwevend
43. Ga naar de foto die je wilt gebruiken
Bewerken – kopieren
44. Bewerken – plakken - plakken als nieuwe laag
Eventueel verkleinen
45. Activeer je verplaatsingstool en schuif je foto in de selectie
46. Selecties – omkeren
Druk op delete op je toetsenbord
47. Selecties – niets selecteren
48. Aanpassen – scherpte – verscherpen
49. Effecten – 3d effecten – slagschaduw
Zelfde instellingen
50. Ga naar je lagen palet en verwijder Small Photo 2 laag
En maak Small Photo 3 laag actief
51. Herhaal punten 40 t/m 50 met de lagen Small Photo 3 en Small Photo 4
52. Maak Raster 2 laag actief in je lagen palet
53. Selecties – alles selecteren
54. Selecties – zwevend
55. Selecties – niet zwevend
56. Selecties – wijzigen – selectieranden selecteren – Buiten – 7 – anti alias aanvinken
57. Lagen – nieuwe rasterlaag
58. Activeer je vulemmer en vul de rand met wit
59. Selecties – niets selecteren
60. Lagen – samenvoegen - omlaag samenvoegen
61. Ga naar je lagen palet en maak Stitches 1 laag actief
62. Selecties – alles selecteren
63. Selecties – zwevend
64. Selecties – niet zwevend
65. Selecties - wijzigen - uitbreiden - 1 pixel
66. Lagen – nieuwe rasterlaag
67. Activeer vulemmer en vul de selectie met wit
68. Selecties – niets selecteren
69. Effecten – 3d effecten – slagschaduw
horizontaal en verticaal 1 – dekking 80 – vervaging 1 – zwart
70. Ga naar je lagen palet en verwijder Stiches 1 laag
Maak Stiches 2 laag actief
71. Selecties – alles selecteren
72. Selecties – zwevend
73. Selecties – niet zwevend
74. Selecties - wijzigen - uitbreiden - 1 pixel
75. Lagen – nieuw rasterlaag
76. Activeer je vulemmer en vul de selectie met wit
77. Effecten – 3d effecten – slagschaduw
zelfde instellingen
78. Ga naar je lagen palet en maak raster 2 actief (grote foto laag)
79. Ga nu naar papierrandje 1,
Bewerken – kopieren
80. Ga terug naar je template,
Bewerken – plakken – plakken als nieuwe rasterlaag
81. Afbeelding – vrij roteren – links 6
82. Activeer je verplaatsingstool en schuif het papierrandje op de juiste plek op de hoek van de foto (zie voorbeeld)
83. Effecten – 3d effecten – slagschaduw
horizontaal en verticaal 2 – dekking 40 – vervaging 2 – zwart
84. Ga nu naar papierrandje 2
Bewerken – kopieren
85. Ga terug naar je template,
Bewerken – plakken – plakken als nieuwe laag
86. Afbeelding - spiegelen
87. Afbeelding – vrij roteren – rechts 6
88. Activeer je verplaatsingstool en schuif het papierenrandje op de juiste plek op de hoek van de foto (zie voorbeeld)
89. Effecten – 3d effecten – slagschaduw
Zelfde instellingen
90. Ga nu naar je nietje,
Bewerken – kopieren
91. Ga terug naar je template,
Bewerken – plakken – plakken als nieuwe laag
92. Activeer verplaatsingstool en schuif het nietje op de papierenrandjes
(zie voorbeeld)
93. Effecten – 3d effecten – slagschaduw
Zelfde instellingen
94. Activeer je verplaatsingstool en schuif Flower doodle (bloem die over je foto valt)
op de juiste plek (zie voorbeeld)
95. Lagen – dupliceren
96. Maak Flower Doodle laag (originele laag) actief in je lagen palet
97. Effecten – foto-effecten – Sepiakleuring – 35
98. Maak nu je kopie van de flower doodle actief in je lagen palet
99. Selecties – alles selecteren
100. Selecties – zwevend
101. Selecties – niet zwevend
102. Lagen – nieuw rasterlaag
103. Ga naar je materiaal palet en verander voorgrondkleur in #e9e3cb
104. Activeer je vulemmer en vul je selectie met voorgrondkleur
105. Selecties – niets selecteren
106. Ga nu naar je lagen palet en verwijder kopie van flower doodle laag
En maak de bovenste Flower doodle laag actief (die beige is)
107. Activeer wisser, grootte 38 hardheid 100 en wis de stelen en laat de bloem staan
(nu heb je sepia stelen en beige bloemen)
108. Ga naar je lagen palet en maak flower 2 laag actief
109. Lagen - samenvoegen - omlaag samenvoegen
110. Selecties – alles selecteren
111. Selecties – zwevend
112. Selecties – niet zwevend
113. Ga naar je materiaal palet en zet je voorgrondkleur op #c00000
en achtergrondkleur op wit
114. Activeer je vulemmer en vul je selectie met voorgrondkleur
115. Selecties – wijzigen – uitbreiden – 2 pixels
116. Lagen – nieuwe rasterlaag
117. Vul nu je selectie met wit
118. Selecties - niets selecteren
119. Lagen – schikken – omlaag verplaatsen
120. Maak Raster 1 actief in je lagen palet.
121. Ga nu naar je achtergrondpapiertje,
Bewerken – kopieren
122. Ga terug naar je template,
Bewerken – plakken – plakken als nieuwe laag
123. Afbeelding – formaat wijzigen – 95 procent
formaat van alle lagen wijzigen uitgevinkt
124. Activeer je toverstaf - modus: toevoegen – tolerantie en doezelen 0
Selecteer de randjes
125. Maak raster 1 actief in je lagen palet
en druk op delete op je toetsenbord
126. Ga nu weer naar je lagen palet en verwijder de laag met je achtgrondpapiertje
127. Selecties – niets selecteren
128. Maak achtergrond laag actief in je lagen palet en zet de dekking op 65
129. Activeer vulemmer en vul deze laag met achtergrondkleur (wit)
130. Lagen – nieuwe rasterlaag
131. Ga naar je materiaal palet en verander voorgrondkleur in #808080
132. Activeer vulemmer en vul de laag met je voorgrondkleur
133. Lagen – schikken – achteraan
134. Effecten – insteekfilters – filter factory A - poolshadow
135. Ga naar je lagen palet maak je bovenste laag actief
136. Lagen – nieuwe rasterlaag, plaats hier op je watermerk
Opslaan en klaar is Flower Template
Wij zijn heel benieuwd naar jouw uitwerking van deze les.
Deze les mag niet zonder toestemming van EM Design
op een andere forum of website's geplaatst worden.
Deze les is gemaakt op 22 februari 2009
Een soort gelijke les berust louter op toevalligheden


 Groeten,
Esther en Martin
EM Design
Groeten,
Esther en Martin
EM Design


