
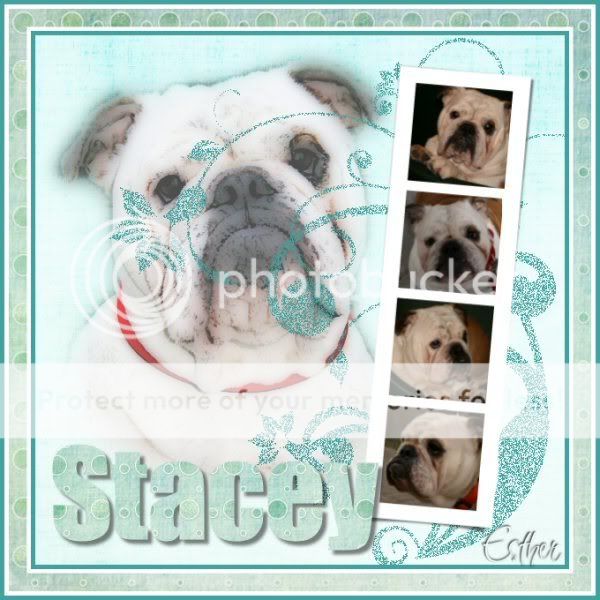
Click on the image for truth size
Needed:
4 photo's (approximately 266 x 266 pixels)
1 photo (approximately 400 x 476 pixels )
2 achtergrond plaatjes (background images)
Tubes:
1 Swirl tube
1. Foto Stripje tube
Font:
Impact
Plugins:
Xero
Materiaal
1. Open the photo's and tubes in psp
2. Go to the big photo (400 x 476 pixels)
3. Layers - promote background layer
4. Activate freehand selection tool - point to point - feather 25
5. Select the part of the photograph what you wish to accentuates,
I have chosen for the head.
6. Selections - invert
Press on delete on the keyboard
7. Selections - select none
8. Open a new image 600 x 600 pixels transparent
9. Ga to achtergrond 1 image
Edit - copy
10. Return to your image
Edit - paste - paste as a new layer
11. Layers - arrange - move down
12. Go to the layer palette and make raster 1 active
13. Go to the materials palet and take a foreground color with you piped from your photo
14. Activat flood fill tool and fill the image with foreground color
15. Go to the layer palette and set by raster 1 opacity on 70 and blend mode onhue
16. Go to the big photo (400 x 476 pixels)
Edit - copy
17. Return to your image
Edit - paste - paste as a new layer
18. Activate move tool and move the photo on the correct spot
(see example)
19. Layers - merge - merge all flatten
20. Effects – plugins – Xero – Illustrator
Abstraction: 70 and Colouration: 120
21. Layers - promote background layer
22. Go to the layer palette and set opacity on 70
23. Go to the fotostripje
Edit - copy
24. Return to your image
Edit - paste - paste as a new layer
25. Activate magic wand - modus: replace - feather 0
Select the insite of the upper photo frame
26 Selections - modify - expand - 4 pixels
27. Go to the photo which must in the upper frame
Edit - copy
28. Return to your image
Edit - paste - paste as a new layer
29 Activate move tool and move the photo to the correct spot in the selection
30. Selections - invert
Press on delete on the keyboard
31. Selection - select none
32. Layers - arrange - move down
33. Go to the layer palette and make raster 2 active
34. Layers - merge - merge down
35. Repeats point 25 till 34 for the last three frames
36. Image - rotate - free rotate – right 5
37. Activate move tool and move the filmstripje to the right
(see example)
38. Go to the swirl tube
Layers - new raster layer
39. Activate flood fill tool and fill the layer with a color which is appropriate at the image
40. Go to the layer palette and activate raster 2
41. Selections – select all
42. Selections - float
43. Selections - defloat
44. Go to the layer palette and activate raster 1
45. Selections – invert
Press on delete on the keyboard
46. Selections - select none
47. Edit - copy
48. Return to your image
49. Go to the layer palette and make raster 1 active
50. Edit - paste - paste as a new layer
51. Go to the layer palette and set opacity on 50 and blend mode on Dissolve of raster 1
52. Go to achtergrond 2 image
Adjust - hue and saturation - colorize
take the H and S from je foreground color
53. Activate text tool,


54. Type a name.
Edit - copy
55. Return to your image
Edit - paste - paste as a new layer
56. Layers - arrange - bring to top
57. Effects – 3D effects – drop shadow
Vertical and horizontal 5 - opacity 50 - blur 5 - color black
58. Activate move tool and move the text on the correct spot
59. Image – add borders - 5 pixels, same color of the swirl tube
(Click on the question on okay)
60. Image - add borders - 5 pixels - White
61. Image - add borders - 20 pixels - other color
62. Activate magic wand and select the 20 pixel border
63. Go back to achtergrond 2 plaatje
Selections - select none
64. Edit - copy
65. Return to the image
Edit - paste - paste into selection
66. Selections - select none
67. Image - add borders - 5 pixels - White
68. Image - add borders - 5 pixels
same color as point 51
69. Layers - new raster layer, place on this your water mark
70. Layers - merge - merge all flatten
71. Image - resize – 600 pixels
Save and ready is Fotostrip Tag klaar.
We are very curious to your development of this tutorial.
This lesson cannot without authorisation of EM design on another
forum or website' s be placed. This lesson has been made on
3 maart 2008 A type equal lesson relies purely on contingency


Geen opmerkingen:
Een reactie posten