skip to main |
skip to sidebar

Click on the image for truth size.
Click here to make the tutorial
Click on the image for truth size.
Needed:
1 Tube (you can use also the tube in material)
Selections:
EM Design 4
EM Design 39
Texture:
Jungle Fever
Pattern:
Goud patroon
Download Material
1. Open a new image 500 x 500 pixels transparent.
2. Open your tube or the tube in the material in psp.
Take with your pipette a dark color from your tube
3. Selections - select all,
Selections - modify - select selections borders.
4. Activate flood fill tool, fill the border with your dark color.
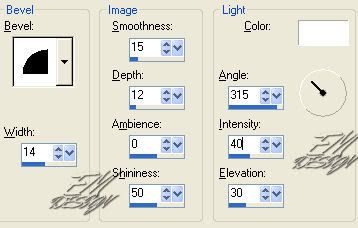
5. Effects - 3D effects - inner bevel
6. Selections - select none
7. Image - resize - 80 percent, repeat this again.
Risize all layers not active
8. Layers- duplicate.
9. Image - resize - 80 percent, repeat this 3 times.
Risize all layers not active
10. Activate move tool, move the small square to left above in the angle
1 cube of above and from the side.
11. Layers- duplicate.
Image-flip,
Image-mirror
12. Activate raster 1 in your layer palette.
13. Activate magic wand, select the big square.
Tolerance and Feather 0
14.Search texture jungle Fever at your dark color in your material palette.
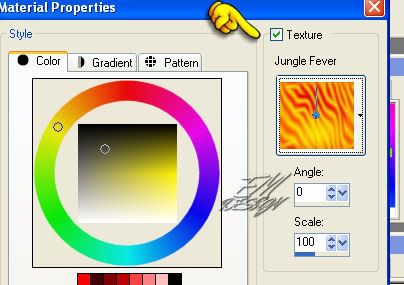
15. Activate flood fill tool, fill the square with the texture
16. Selections - select none
17. Activate copy (2) of raster 1 in your layer palette.
18. Layers - new rasterlayer.
19. Selections - selections load/save - load selection from disk - EM Design 39.
(Replace selection and source luminance.)
20. Close the texture in your material palette
Activate flood fill tool, fill the selectie with your dark color.
21. Selections - select none.
22. Layers - duplicate.
Image - flip,
Image - mirro.
23. Activate mover tool, move the bottom beams so that above and lower part equal is.
(see example)
24. Layers - new rasterlayer.
25. Selections - selections load/save - load selection from disk - EM Design 4.
(Replace selection and source luminance.)
26. Activate flood fill tool, fill the selectie with your dark color.
27. Selections - select none.
28. Image - mirro.
29. Layers - duplicate.
Image - flip,
Image - mirro.
30. Go to your tube,
make a copy of it with shift d.
31.Image - resize, make the copy 130 pixels on the longest side
32. Edit - Copy
33. Return to your image,
Edit - paste - paste as a new layer
34. Activate mover tool,
move your tube in the small square on the upper part.
(Possibly you can 1 time, adjust - sharpness - sharpen)
35. Layers - duplicate.
Image - mirro.
36. Activate mover tool, move your tube nicely in the small square to the lower part.
37. Go now to your original tube,
Image - resize, make the tube 359 pixels on the longest side
38. Edit - copy.
39. Return to your image,
Edit - paste - paste as a new layer
40. Activate mover tool and move your tube nicely in the large side
41. 2 times, Layers - arrange - move down
42. Activate copy of raster 3 in your layer palette
43. Activate text tool, font : Aachen vertical - create as vectorlaag -
Size 50
44. Puts the dark color as background color and gold (goud) pattern as forefront color in your material palette.
(angle :359 scale: 129) in your material palette
45. Type your text, Turn the text vertical.
46. Layers - convert to rasterlayer
47. Activate mover tool, move your text firstly on the left side of the large square.
reduce the text if that is necessary.
48. Effects - 3D effects - inner bevel, same institutions
49. Activate text tool, font : Aachen vertical - make as vectorlaag -
Size 50
50. Type your second text, Turn the text vertical.
51. Layers - convert to rasterlayer
52. Activate mover tool, move your text firstly on the right side of the large square.
reduce the text if that is necessary.
53. Effects - 3D effects - inner bevel, same institutions
54. Layers - new rasterlayer, and place on this your water mark.
55. Layers - merge - merge visible
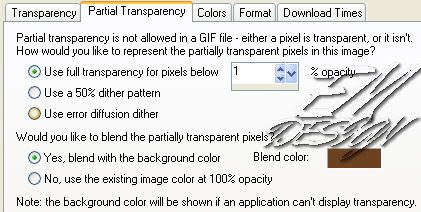
56. file - export - GIF optimizer.
Transparency:
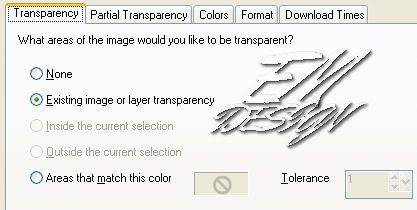
partial transparency:
Je bewerking een naam geven en opslaan.
and ready is Jungle Fever.
We are very curious to your development of this tutorial.
This lesson cannot without authorisation of EM design on another
forum or website' s be placed. This lesson has been made on
1 november 2006 A type equal lesson relies purely on contingency
Onze 66e!
DownloadHier
Please leave your comments.
Onze 65e!
Download Hier
Please leave your comments

Click on the image for truth size.
Click here to make the tutorial
Click on the image for truth size.
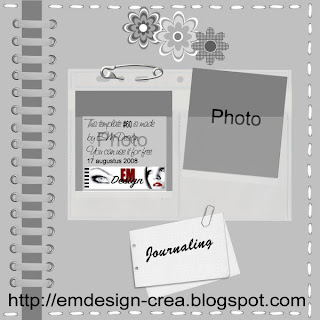
Needed:
Photo of the front
Tube ( 245 x 355 pixels)
Goud (gold) pattern
Marmer look brush
EM Design Trio Blocks selection
[img=http://www.4shared.com/file/60494319/ecf70b7e/Three_Pieces_Tag.html]Download Material[/img]
1. Open your photo and tube in psp
2. Take with your pipette a light forefront color and a dark backgrount color from your tube.
3. Open a new image 600 x 450 pixels transparent.
4. Activate flood fill tool, fill the empty image with your forefront color.
5. Effects - texture effects - blinds – Width 4, Source 50, background color, only horizontal active.
6. Activate selection tool – selection - costum selection.

7. Layers - new rasterlayer
8. Activate flood fill tool, fill the selection with your background color
9. Selections - select none
10. Layers - new rasterlayer
11. Selections - selections load/save - load selection from disk – EM Design Trio Blocks
(Luminance from source, replace selection)
12. Activate flood fill tool, fill the selection with your background color.
13. Selections - select none
14. Activate Magic wand, tolerance and feather 0
Select the upper square
15. Selections - modify - contract - 3 pixels
16. Go to your photo,
Edit - copy
17. Return to your new image,
Edit - paste - paste as a new layer
18. Activate move tool ,
move your photo this way that the left eye is in your selection.
19. Selections - invert,
Press now on delete on your keyboard
20. Selecties – niets selecteren
21. Repeat point 14 up to 21 at the other 2 squares,
(I have the muzzle in the middle and right eye below)
22. Lock raster 1 and 2 in your Layer palette.
23. Layers - merge - merge visible
24. Open raster 1 and 2 in your layer palette.
25. Effects - 3D effects - dropshadow
horizontal and vertical 5, Opacity 50, blur 5, color black
26. Chance your forefront color in gold pattern (goud),
Angle 357, scale 120
27. Make raster 2 active in your layer palette
Layers - new rasterlayer
28. Activate your paint brush - Marmer look - Size 300
Stamp a couple time in the middle area (see example)
29. Layers - duplicate
Image - flip
30. Go to your tube,
Edit - copy
31. Return to your new image,
Edit - paste - paste as a new layer.
32. Layers - duplicate
33. Make raster 4 (bottom tube) active in your layer palette.
34. Effects - texture effects - mosaic antique

35. Activate move tool , move you upper tube (copy raster 4) something left down
36. Activate text tool, Arial, size 250 (size can differ by the length from the name)
type the name
37. Layers - convert to rasterlayer
38. Image - rotate - free rotate - right 90
39. Activate mover, move the name on the correct spot
(see example)
40. Effects - 3D effects - dropshadow,
Horizontal en vertical 1, Opacity 100, blur 0, color black
41. Layers - new rasterlayer, place on this layer your water mark.
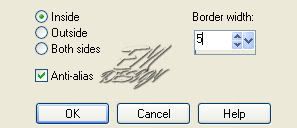
42. Image - add borders – 2 pixels white
click on OK at the question.
43. Activate Magic wand , select the border
44. Activate flood fill tool, fill the border with your forefront gold pattern.
45. Selections - select none
46. Image - add borders – 5 pixels background color
47. Image - resize – 600 pixels width
save as JPG and Three Pieces is ready
We are very curious to your development of this lesson.
This lesson cannot without authorisation of EM design on another
forum or website' s be placed. This lesson has been made on
29 March 2008 A type equal lesson relies purely on contingency

Klik op de bewerking voor ware grootte.
Klik hier om de les te maken
Klik op de bewerking voor ware grootte.
Benodigdheden:
Foto van de voorkant
Tube ongeveer 245x355 pixels
Goud patroon
Marmer look brush
EM Design Trio Blocks selectie
Materiaal
1. Open je foto en tube in psp
2. Neem met je pipet een lichte voorgrondkleur en een donkere achtergrondkleur uit
je tube
3. Open een nieuwe afbeelding 600 x 450 pixels transparant
4. Activeer je vulemmer, vul je nieuwe afbeelding met je voorgrondkleur
5. Effecten – textuureffecten – lamellen –breedte 4, dekking 50, kleur achtergrondkleur,
Alleen horizontaal aangevinkt.
6. Activeer je selectie gereedschap – aangepaste selectie.

7. Lagen – nieuwe rasterlaag
8. Activeer je vulemmer, vul de selectie met je achtergrondkleur
9. Selecties – niets selecteren
10. Lagen – nieuwe rasterlaag
11. Selecties – selectie laden/opslaan – selectie laden vanaf schijf – EM Design Trio Blocks
luminantie van bron, selectie vervangen aangevinkt
12. Vul de selectie met je achtergrondkleur
13. Selecties – niets selecteren
14. Activeer je toverstaf, tolerantie en doezelen 0
Selecteer de bovenste blokje
15. Selecties – wijzigen – inkrimpen 3 pixels
16. Ga naar je foto,
Bewerken – kopieren
17. Ga nu terug naar je bewerking,
Bewerken – plakken – plakken als nieuwe laag
18. Activeer je verplaatsingstool,
schuif je foto zo dat het linker oog in je selectie hebt.
19. Selecties – omkeren
Druk op je delete toets op je toetsenbord
20. Selecties – niets selecteren
21. Herhaal punt 14 t/m 20 met de andere 2 blokjes
ik heb de snuit in het midden gezet en het rechter oog onderaan.
22. Zet je Raster 1 en 2 op slot door op het oogje
te klikken in je lagen palet.
23. Lagen – samenvoegen – zichtbare lagen samenvoegen
24. Haal raster 1 en 2 weer van slot in je lagen palet.
25. Effecten – 3d effecten – slagschaduw
horizontaal en verticaal 5, dekking 50, vervaging 5, kleur zwart
26. Zet je voorgrondkleur nu op goud patroon, hoek 357, schaal 120
27. Maak raster 2 actief in je lagen palet
Lagen – nieuwe rasterlaag
28. Activeer je brush - Marmer look - grootte 300
Stempel een paarkeer in het middelste vlak
29. Lagen – dupliceren
afbeelding – omkeren
30. Ga nu naar je tube,
bewerken – kopieren
31. Ga terug naar je afbeelding
Bewerken – plakken – plakken als nieuwe laag
32. lagen – dupliceren
33. Maak de rasterlaag 4 (onderste tube) actief in je lagen palet.
34. Effecten – textuureffecten – mozaïek antiek

35. Activeer je verplaatsingstool, schuif je bovenste
tube is links naar benden
36. Activeer je tekst gereedschap, Arial grootte 250 (grootte ligt aan de lengte van de naam)
type je naam
37. Lagen – omzetten in rasterlaag
38. Afbeelding – vrij roteren – rechts 90
39. Activeer je verplaatsingstool, schuif de naam op de juiste plek
(zie voorbeeld)
40. Effecten – 3d effecten – slagschaduw,
Horizontaal en verticaal 1, dekking 100, vervaging 0, kleur zwart
41. Lagen – nieuwe rasterlaag, plaats hier je watermerk op.
42. Afbeelding – randen toevoegen – 2 pixels wit
klik op ok bij de vraag.
43. Activeer je toverstaf, selecteer de rand
44. Activeer je vulemmer, vul de rand met goudpatroon
45. Selecties – niets selecteren
46. Afbeelding – randen toevoegen – 5 pixels achtergrondkleur
47. Afbeelding – formaat wijzigen – 600 pixels breed
Opslaan als JPG en klaar is Three Pieces tag
Wij zijn heel benieuwd naar jouw uitwerking van deze les.
Deze les mag niet zonder toestemming van EM Design
op een andere forum of website's geplaatst worden.
Deze les is gemaakt op 29 maart 2008
Een soort gelijke les berust louter op toevalligheden
Onze 64e!

Download Hier
Please leave your comments.
Another who fills this template, looks great, thank you!
 Made bij Harsie from the Netherlands.

Click on the image for truth size.
Click here to make the tutorial
Another who make this tutorial, looks great, thank you!
 Made by Kirsten from Denmark
Click on the image for truth size.
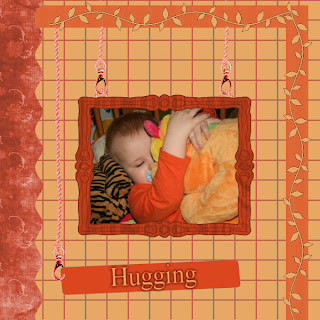
Needed:
Magical Cat 12 tube's
You can use your own tube instead of the cat (295 pixels width)
and your own woman tube (185 pixels high)
Plugin:
Filters Unlimited 2.0
Download material
1. Open all tube’s
2. Open a new image 500 X 500 pixels transparent.
3. Set your forefront color on #FBFBE9 and your background color on #988670
4. Activate flood fill tool, fill the empty image with your forefront color.
5. Effects – plugin - Filter Unlimited 2 - Paper Textures - Cotton Paper Coarse.
Intensity: 128 and Lightness: 94
6. Adjust - hue and saturation-colorize
hue: 32 and Saturation: 41
7. Go to your Magical Cat tube 1 ketting
Edit - copy
8. Return to your new image.
Edit - paste - paste as a new layer
9. Activate mover, move your tube at the left-hand side.
With the first small bead against the upper part.
(see Exemple)
10. Adjust - hue and saturation-colorize
hue: 32 and Saturation: 41
11. Go to your Magical Cat tube 2 elastiek,
Edit - copy
12. Return to your new image.
Edit - paste - paste as a new layer
13. Activate mover, move the tube to the lower part
A small bit from the lower part. (see example)
14. Adjust - hue and saturation-colorize
hue: 32 and Saturation: 41
15. Go to your Magical Cat tube template
Edit - copy
16. Return to your new image.
Edit - paste - paste as a new layer
17. Activate mover, move the tube to the judge above angle.
(sse Example)
18. Go to your Magical Cat tube 4 bloem
Edit - copy
19. Return to your new image.
Edit - paste - paste as a new layer
20. Activate mover, move the tube Right to the lower part of your template. (see example)
21. Adjust - hue and saturation-colorize
hue: 32 and Saturation: 41
22. Go now to your Magical Cat tube 6 photo or a tube to own choice.
Edit - copy
23. Return to your new image.
Edit - paste - paste as a new layer
24. activate mover, move the tube or photo in your template,
(see Example)
25. Adjust - hue and saturation-colorize
hue: 32 and Saturation: 41
26. Go to your Magical Cat tube 5 lintjes
Edit - copy.
27. Return to your new image.
Edit - paste - paste as a new layer
28. Activate mover, move the tube in the judge above angle of the template. (see example)
29. Activate raster deform tool, turn the tube something to Right.
(see example)
30. Adjust - hue and saturation-colorize
hue: 32 and Saturation: 41
31. Go to your Magical Cat tube 7 lintdopje,
Edit - copy
32. Return to your new image.
Edit - paste - paste as a new layer
33. Activate mover, move the tube on Magical Cat tube 5 lintjes.
(see example)
34. Adjust - hue and saturation-colorize
hue: 32 and Saturation: 41
35. Go to your Magical Cat tube 8 veiligheidspeld,
Edit - copy
36. Return to your new image.
Edit - paste - paste as a new layer
37. Activate mover, move the tube in the template on the third sheet.
(seex example)
38. Adjust - hue and saturation-colorize
hue: 32 and Saturation: 41
39. Go to your Magical Cat tube 9 magical woord,
Edit - copy
40. Return to your new image.
Edit - paste - paste as a new layer
41 Activate mover, move the tube to the upper part something to left.
42. Adjust - hue and saturation-colorize
hue: 32 and Saturation: 41
43. Go to your Magical Cat tube 10 label,
Edit - copy
44. Return to your new image.
Edit - paste - paste as a new layer
45. Activate mover, move the tube to left beside the collar.
(see example)
46. Adjust - hue and saturation-colorize
hue: 32 and Saturation: 41
47. Go to your Magical Cat tube 11 pin,
Edit - copy
48. Return to your new image.
Edit - paste - paste as a new layer
49. Activate mover, move the tube in the collar of the label
(sse example)
50. Activate raster deform tool, turn the tube something.
(see example)
51. Adjust - hue and saturation-colorize
hue: 32 and Saturation: 41
52. Go to your Magical Cat tube 12 kat,
Edit - copy
53. Return to your new image.
Edit - paste - paste as a new layer
54. Activate mover, move the tube exactly on the edge, at the left-hand side.
(see example)
55. Adjust - hue and saturation-colorize
hue: 32 and Saturation: 41
56. Activate the text tool, select a beautiful font, size and region breadth on own insight, make as a vector layer.
57. type CAT, drawer and turn the text in the label.
58. Layers - convert to rasterlayer
59. Layers - new rasterlayer, place here your watermark.
60. Layers - merge - merge all flatten
Save as .jpg and ready is Magical Cat scrap.
We are very curious to your development of this lesson.
This lesson cannot without authorisation of EM design on another
forum or website' s be placed. This lesson has been made on
8 November 2006 A type equal lesson relies purely on contingency

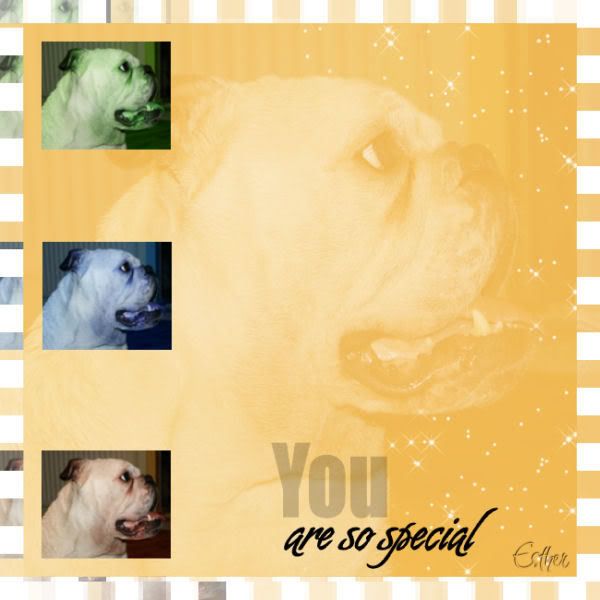
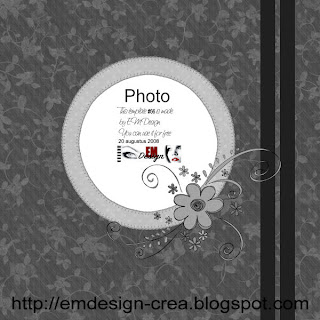
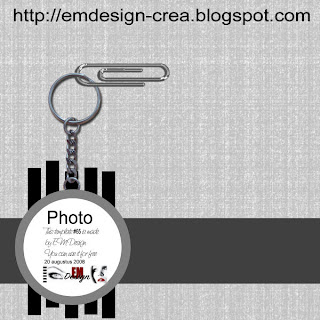
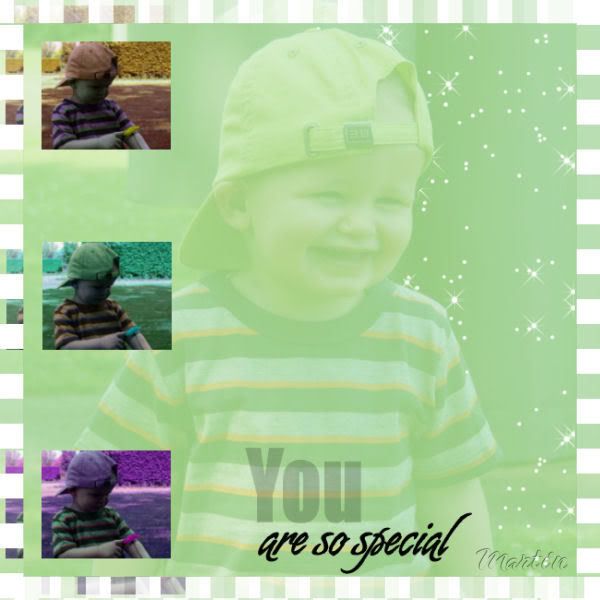
Click on the image for truth size.
Click here to make the tutorial
Click on the image for truth size.
Needed:
Photo (600 x 600 pixels)
Photo (200 x 200 pixels)
EM Design 3 blocks (600x600) selection
Word Art You are so special tube
Sterretjesbrush
Unlimited 2.0 plugin
DSB Flux plugin
Download material
1. Open your photo’s and tube in psp.
2. Open a new image 600 X 600 pixels transparent.
3. Take two colors, forefront colour on a light color to choice and backgroundcolor is white
4. Activate flood fill tool, fill the empty image with your forefront color.
5. Go to your photo of 600 x 600 pixels
Edit - copy
6. Go to your new image,
edit - paste - paste as a new layer
7. Go to your Layer palette, Opacity 60 and Blend mode on overlay
8. Layers - new rasterlayer
9. Selections - selections load/save - load selection from disk –
EM Design 3 blocks (600x600) (luminance from source, replace selection)
10. Activate flood fill tool and fill the selections with your backgroundcolor
11. Selections - select none
12. Activate Magic wand, tolerance and feather 0
Select the upper square
13. Go to your photo of 200 x 200 pixels
Edit - copy
14. Return to your new image
Edit - paste - paste as a new layer
15. Image - resize – 80 percent,
resize all layers - not active
16. Image - resize – 90 percent,
resize all layers - not active
17. Activate move tool , move the photo in the selection.
18. Effects - plug in – Unlimited 2.0 – color effects – swap red/green
19. Selections - invert,
Press now on delete on your keyboard
20. Selections - select none
21. Make raster 3 active in your Layer palette.
Activate Magic wand, tolerance and feather 0
Select the second square.
22. Edit - paste - paste as a new layer
23. Image - resize – 80 percent,
resize all layers - not active
24. Image - resize – 90 percent,
resize all layers - not active
25. Activate move tool , move the photo in the selection.
26. Effects - plug in – Unlimited 2.0 – color effects – swap red/blue
27. Selections - select invert,
Press now on delete on your keyboard
28. Selections - select none
29. Make raster 3 active in your Layer palette.
Activate Magic wand, tolerance and feather 0
Select the bottom square.
30. Edit - paste - paste as a new layer
31. Image - resize – 80 percent,
resize all layers - not active
32. Image - resize – 90 percent,
resize all layers - not active
33. Activate move tool , move the photo in the selection.
34. Effects - plug in – Unlimited 2.0 – color effects – swap green/blue
35. Selections - select invert,
Press now on delete on your keyboard
36. Selections - select none
37. Image - add borders – 25 pixels – white.
Click at the question on OK
38. Activate Magic wand, tolerance and feather 0,
Select the white border
39. Effects - plug in – DSB flux – linair transmission - vertical.
40. Effecten – insteekfilters – DSB flux – linair transmission - horizontal
41. Selections - select none
42. Layers - new rasterlayer
43. Activate paint brush, sterretjesbrush – size 300
Stamp 2x with your right mouse button (white) at the right-hand side within the big square.
44. Layers - duplicate,
Image - flip
45. Layers - merge - merge down.
46. Activate eraser tool, form - round, size - 100, hardnesses - 100.
Erase the sparklers which stand on your photo.
47. Go to your Word Art You are so special tube
Edit - copy
48. Return to your new image.
Edit - paste - paste as a new layer
49. Activate mover tool,
move the tube to the Right bottom in the middle
(see example)
50. Image - resize – 600 x 600 pixels
resize all layers, active
51. Layers - new rasterlayer, place here your watermark.
Store as jpg and You are so special tutorial is ready.
We are very curious to your development of this lesson.
This lesson cannot without authorisation of EM design on another
forum or website' s be placed. This lesson has been made on
20 augusts 2008 A type equal lesson relies purely on contingency
Klik op de bewerking voor ware grootte.
Klik hier om de les te maken
Klik op de bewerking voor ware grootte.
Benodigdheden:
Foto (600 x 600 pixels)
Foto (200 x 200 pixels)
EM Design 3 blocks (600x600) selectie
Word Art You are so special tube
Sterretjesbrush
Unlimited 2.0 insteekfilter
DSB Flux insteekfilter
Materiaal
1. Open je foto’s en tube in psp en plaats je selectie en brush in de juiste map.
Maak je foto’s op maat indien dat nodig is.
2. Open een nieuwe afbeelding 600 x 600 pixels transparant
3. Ga naar je materiaal palet en zet je voorgrondkleur op een lichte kleur naar keuze
en je achtergrondkleur op wit
4. Activeer je vulemmer, vul je nieuwe afbeelding met je voorgrondkleur
5. Ga nu naar je foto van 600 x 600 pixels
Bewerken – kopieren
6. Ga terug naar je nieuwe afbeelding,
bewerken – plakken – plakken als nieuwe laag
7. Ga nu naar je lagen palet, ze modus op overlay en dekking op 60
8. Lagen – nieuwe rasterlaag
9. Selecties – selectie laden/opslaan – selectie laden van schijf –
EM Design 3 blocks (600x600) (luminantie van bron en selectie vervangen)
10. Activeer je vulemmer en vul de selecties met je achtergrondkleur
11. Selecties – niets selecteren
12. Activeer je toverstaf, tolerantie en doezelen op 0..
Selecteer je bovenste vierkantje.
13. Ga naar je foto van 200 x 200 pixels
Bewerken – kopieren
14. Ga terug naar je afbeelding,
Bewerken – plakken – plakken als nieuwe laag
15. Afbeelding – formaat wijzigen – 80 procent,
Formaat alle lagen wijzigen uitgevinkt
16. Afbeelding – formaat wijzigen – 90 procent,
Formaat alle lagen wijzigen uitgevinkt
17. Activeer je verplaatsingstool, schuif je foto in de selectie.
18. Effecten – insteekfilter – Unlimited 2.0 – color effects – swap red/green
19. Selecties – selectie omkeren,
druk nu op je delete toets op je toetsenbord.
20. Selecties – niets selecteren
21. Maak raster 3 actief in je rasterlaag.
Activeer je toverstaf, Selecteer je tweede vierkantje.
22. Bewerken – plakken – plakken als nieuwe laag
(als het goed is staat je kleine foto er nog in)
23. Afbeelding – formaat wijzigen – 80 procent,
Formaat alle lagen wijzigen uitgevinkt
24. Afbeelding – formaat wijzigen – 90 procent,
Formaat alle lagen wijzigen uitgevinkt
25. Activeer je verplaatsingstool, schuif je foto in de selectie.
26. Effecten – insteekfilter – Unlimited 2.0 – color effects – swap red/blue
27. Selecties – selectie omkeren,
druk nu op je delete toets op je toetsenbord.
28. Selecties – niets selecteren
29. Maak raster 3 actief in je rasterlaag.
Activeer je toverstaf, Selecteer je tweede vierkantje.
30. Bewerken – plakken – plakken als nieuwe laag
(als het goed is staat je kleine foto er nog in)
31. Afbeelding – formaat wijzigen – 80 procent,
Formaat alle lagen wijzigen uitgevinkt
32. Afbeelding – formaat wijzigen – 90 procent,
Formaat alle lagen wijzigen uitgevinkt
33. Activeer je verplaatsingstool, schuif je foto in de selectie.
34. Effecten – insteekfilter – Unlimited 2.0 – color effects – swap green/blue
35. Selecties – selectie omkeren,
druk nu op je delete toets op je toetsenbord.
36. Selecties – niets selecteren
37. Afbeelding – randen toevoegen – 25 pixels – wit.
Klik bij de vraag op OK
38. Activeer je toverstaf (instellingen staan goed),
Selecteer de witte rand
39. Effecten – insteekfilters – DSB flux – linair transmission.
Alleen vertical aanvinken.
40. Effecten – insteekfilters – DSB flux – linair transmission.
Nu alleen horizontal aanvinken.
41. Selecties – niets selecteren
42. Lagen – nieuwe rasterlaag
43. Activeer je penseel, sterretjesbrush – grootte 300
Stempel 2x met je rechtermuisknop (wit) aan de rechterkant
Binnen de grootte vierkant.
44. Lagen – dupliceren,
Afbeelding – omdraaien.
45. lagen – samenvoegen – omlaag samenvoegen
46. Activeer je wisser, vorm – rond, grootte – 100, hardheid – 100.
Wis nu de sterretjes die op je foto staan.
47. Ga nu naar je Word Art You are so special tube
Bewerken – kopieren
48. Ga terug naar je afbeelding,
Bewerken – plakken – plakken als nieuwe laag
49. Activeer je verplaatsingstool,
schuif de tube naar de rechts onder in het midden
(zie voorbeeld)
50. Afbeelding - formaat wijzigen – 600 x 600 pixels.
Formaat van alle lagen wijzigen aangevinkt.
51. Lagen – nieuwe rasterlaag, plaats hier je watermerk op.
Opslaan als .jpg en You are so special is klaar.
Wij zijn heel benieuwd naar jouw uitwerking van deze les.
Deze les mag niet zonder toestemming van EM Design
op een andere forum of website's geplaatst worden.
Deze les is gemaakt op 21 augustus 2008
Een soort gelijke les berust louter op toevalligheden
Onze 62e!

DownloadHier
Please leave your comments.
Onze 61e!

Download Hier
Please leave your comments.
Onze 60e!
Download Hier
Please leave your comments.
Onze 59e! (the first one in sepia)

Download Hier
Please leave your comments.
Another who fills this template, looks great, thank you!
 Made by Kirsten from Denmark
Onze 58e!

Download Hier
Pleas leave your comments.
My layout of this template.
Onze 57e!

Download Hier
Please leave your comments.
Onze 56e!

DownloadHier
Please leave your comments.
Onze 55e!
Download Hier
Please leave your comments.
Onze 5e Theme Template!

Download Hier
Please leave your comments.

 Made by Kirsten from Denmark.
 Made by Marcy.
 Made by Wilma (Blaff forum and PSP4ever forum) from The Netherlands

 Made bij Harsie from the Netherlands.
 Made by Harsie from the Netherlands.
 Made by Flávia from Brasil
 Made by Kirsten from Denmark
 Made by Kirsten from Denmark
 Groeten,
Esther en Martin
EM Design
Groeten,
Esther en Martin
EM Design


