

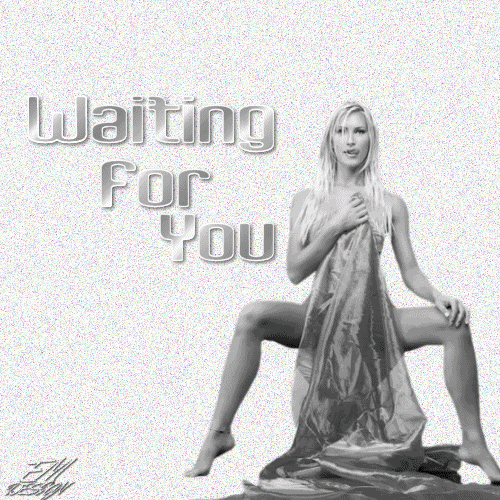
Click on the image for truth size
Needed:
Tube max. size 450 pixels on the longest side
Selection:
EM Design 40
Pattern:
Zilverpatroon
Download material
1. Open a new image 500 X 500 transparent
2. Take a light foreground color (I chose for White) and a dark background color donkere achtergrondkleur (I chose for black)
3. Activate flood fill tool and fill the image with foreground color
4.Layer - new raster layer
5. Selections - selections load/save - load selection from disk - EM Design 40.
Marl source luminance and replace selection
6. Activate flood fill tool, match mode RGB value and fill every rectangle with a differend color, I chose for the grey color, it is most beautiful to start with dark color and to end with light color (see example)
Pay attention: Layers - new raster layer by every rectangle
7. Selections - select none
8. Go to the tube
Edit - copy
9. Return to your image
Edit - paste - paste as a new layer
10. Activate move tool and move the tube to the right-hand side, a bit from the edge.
11. Effects - 3D effects - dropshadow
Vertical and Horzontal 2 - opacity 50 - blur 5 - color black
12. Go to the layers palette and make activate raster 1
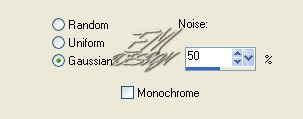
13. Adjust-add/remove noise - add noise Gaussiaans
14. Layers - new raster layer and place on this your water mark
15. Go to your layers palette and make de upper layer active
16. Go to the material palet and set background color on pattern
Pattern: Zilver patroon - angle: 359 - Scale: 120
17. Activat text tool, choose a beautiful font, create as vector maken.
18. type the text and move the text on the right spot (see example)
19. Effects - 3D effects - dropshadow
Vertical and Horzontal 2 - opacity 50 - blur 5 - color black
20. Go to the layers palet and close all lyers with the rectagle's
(click on the eye)
21. Edit - copy merge
22. Open Animation Shop.
23. Edit - paste - as new animation
24. return to psp,
Go to the layers palette and open the layer with de first rectangle (entirely left) by clicking on the eye
25. Edit - copy merge
26. Return to Animation Shop,
Edit - paste - after current frame
27. return to psp,
go to the layer palette and open the layer with the second rectangle
28. Edit - copy merge
29. Return to Animation Shop,
Edit - paste - after current frame
30. Repeats point 27 till 29 to that you have all rectangles in your animation
31. In Animation Shop,
Edit - select all
32. Animation - frame properties - display time 30
Save and ready is Waiting in Vain.
We are very curious to your development of this tutorial.
This lesson cannot without authorisation of EM design on another
forum or website' s be placed. This lesson has been made on
21 november 2006 A type equal lesson relies purely on contingency


Geen opmerkingen:
Een reactie posten