

Click on the image for truth size.
Needed:
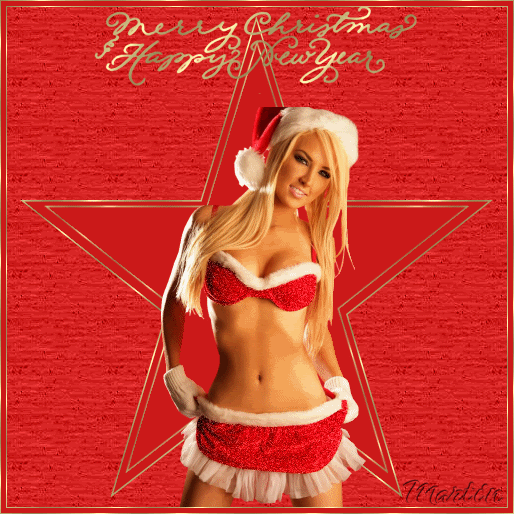
Christmas tube 270 x 270 pixels
Plugin:
Filters Unlimited 2.0
Brush:
agibrush81_merryxmas
Pattern:
Goud patroon
Download Material
1. Open your tube and import the brush in psp,
copy goudpatroon in Pattern
2. Open new image 500 X 500 transparent.
3. Take with your pipet a color from your tube or use #CC1A1A as background color.
set Foreground color on goudpatroon (pattern), Angle 359 and Scale 120.
4. Activate Flood fill tool and fill the image with background color
5. Activate Presets shapes, go to star 2.
Ceate as vector - mark anti alias - width 2,00
6. pull a beautiful star from left above to Right below.
7. objects - align - center in canvas
8. Layers - convert to rasterlayer
9. Layers - duplicate
10. Image - resize - 90 percent
unmarkt resize all layer
11. Go to your tube,
Edit - copy
12. Returm to your image
Edit - paste - paste as a new layer
13. Go to your layer palette and activate raster 1
14. Effects - plugins - Filters Unlimited 2.0 - Paper Textures - Cotton Paper Coarse.

15. Layers - merge - merge all flatten
16. Image - add borders - 1 pixels white.
17. Activate magic wand, tolerance and feather 0 and select the 1 pixel border
18. Activate flood fill tool and fill the border with foreground goldpattern (goudpatroon)
19. Selections - select none
20. Image - add borders - 5 pixels background color
21. Image - add borders - 1 pixel wit.
22. Activate magic wand, tolerance and feather 0 and select the 1 pixel border
23. Activate flood fill tool and fill the border with foreground goldpattern (goudpatroon)
24. Selections - select none
25. Layers - new rasterlayer
26. Activate airbrush, agibrush81_merryxmas - size 335
27. Stamp 2 time at the top in the middle with gold pattern (goudpatroon)
28. Layers - new rasterlayer, and place on this your water mark.
29. Layers - merge - merge all flatten
30. Layers - duplicate
31. Layers - duplicate
32. Go to the layer palette, close Copy of Background and Copy (2) of Background by clicking on the eye. Activate Background layer
33. Activate magic wand, mode: add - match mode: RGB value - tolerance: 30 - feather: 0 (play with the tolerantie, this is by every tube different).
34. Select the big star from Creddy or what you want to select in your own tube. (sometimes you must select a couple times)
35. Adjust - add/remove noise - add noise
Mark Gaussian and Monochrome - noise 30
36. Go to the layer palette, close Background and open Copy of Background by clicking on the eye.
Activate Copy of Background layer
37. Adjust - add/remove noise - add noise
Mark Gaussian and Monochrome - noise 35
38. Go to the layer palette, close Copy of Background and open Copy (2)of Background by clicking on the eye.
Activate Copy (2) of Background layer
39. Adjust - add/remove noise - add noise
Mark Gaussian and Monochrome - noise 40.
40. Selections - select none
41. Go to the layer palette, open Background layer and Copy of Background by clicking on the eye
43. File - save as Creddy.PSP Animation Shop (*.psp)
44. Open Animation shop.
45. Open Creddy.psp ( Creddy.psd) in animation shop
46. Save as gif
and ready is Creddy Christmas Star
We are very curious to your development of this tutorial.
This lesson cannot without authorisation of EM design on another
forum or website' s be placed. This lesson has been made on
9 nvember 2006 A type equal lesson relies purely on contingency


Geen opmerkingen:
Een reactie posten