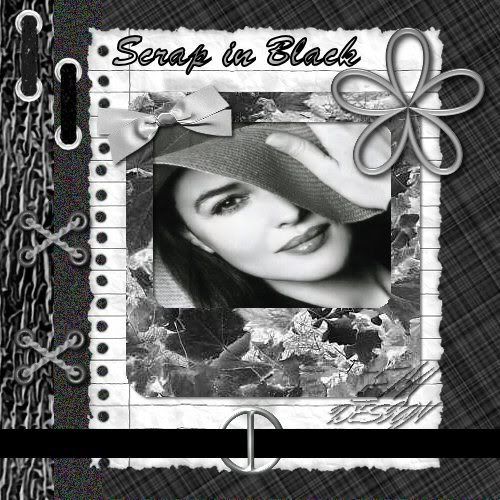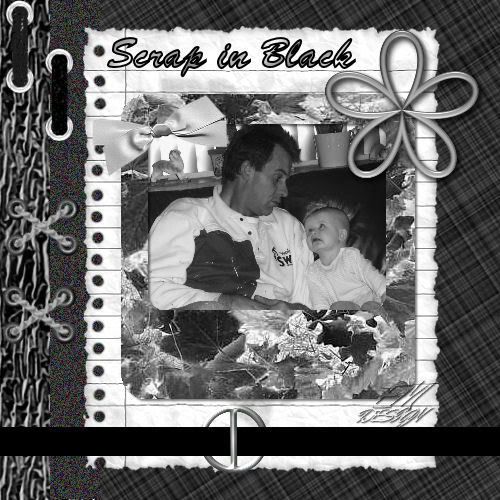
Click on the image for truth size.
Needed:
Scrap in black tube’s 1 t/m 11
Photo or own Tube
Download Material
1. Open the tube's in psp,
Open een new image 500 X 500 transparent.
2. Go to Scrap in black 1,
Edit - copy
3. Return to youir image
Edit - paste - paste as a new layer
4. Go now to Scrap in black 2,
Edit - copy
5 Return to your image
Edit - paste - paste as a new layer
6. Activate move tool and move these to Right against the edge.
7. Go now to Scrap in black 3,
Edit - black
8. Return to your image
Edit - paste - paste as a new layer
9. Activate move tool and move these to Right against the edge
10. Go now to Scrap in black 4,
Edit - copy
11. Return to your image
Edit - paste - paste as a new layer
12. Activate move tool and move the tube approximately in the middle
(see example)
13. Activate selection tool, rounded rectangle, Anti alias active, feather 0.
14. Pull a rectangle something larger than the opening of your frame, you tube or photo must fit in the rectangle.
If you use a photo, skip point 15 till 19.
15. Go to your tube
layers - new rasterlayar
16. Go to your Materials palette, and take with your pipette a background color from your tube.
17. Activate flood fill tool and fill the new raster layer in your tube.
18. Layers - arrange - send to bottom
19. Layers - merge - merge all flatten
Edit - copy, skip point 20
20. Go to your Photo,
Edit - copy
21. Layers - new rasterlayar
22. Return to your image,
Edit - paste - paste into selection
23. Selection - select none
24. Layers - arrange - move down, now is your tube or photo under your frame.
25. Go to your layer palette and close alle layers (by clicking on the eye),
except the layers with the frame and the tube or photo.
26. Layers - merge - merge visible
27. Go to your layer palette and open alle layers (by clicking on the eye)
28. Go to Scrap in black 5,
Edit - copy
29. Return to your image
Edit - paste - paste as a new layer
30. Activate move tool and move the tube to the lower part
under your frame (sse example)
31. Go to Scrap in black 6,
Edit - copy
32. Return to your image
Edit - paste - paste as a new layer
33. Layers - arrange - move down,
34. Layers - arrange - move down,
the tube sits now your frame
35. Activate move tool, move the tube something to left so that the eyes
on the edge sit of scrap in black tube 3 (see example)
36. Make the upper layer active in your layer palette
37. Go to Scrap in black 7,
Edit - copy
38. Return to your image
Edit - paste - paste as a new layer
39. Activate move tool and move the tube to the left upper corner.
40. Go to Scrap in black 8,
Edit - copy
41. Return to your image
Edit - paste - paste as a new layer
42. Activate move tool and move the tube to the right corner of your frame.
43. Effects -3D effects - dropshadow
Vertical en Horizontal 2, opacity 80, blur 5, color black.
44. Go to Scrap in black 9,
Edit - copy
45. Return to your image
Edit - paste - paste as a new layer
46. Activate move tool and move the tube to linker above angle of your frame, and puts the tube on your photo/tube.
47. Effects -3D effects - dropshadow
Vertical en Horizontal 2, opacity 80, blur 5, color black.
48. Go to Scrap in black 10,
Edit - copy
49. Return to your image
Edit - paste - paste as a new layer
50. Activate move tool and move the tube on the second background, exactly on the edge (see example)
51. Effects -3D effects - dropshadow
Vertical en Horizontal 2, opacity 80, blur 5, color black.
52. Layers - duplicate
53. Activate move tool and move these also on the edge, something down
54. Go to Scrap in black 11,
Edit - copy
55. Return to your image
Edit - paste - paste as a new layer
56. Activate move tool and move the tube to the upper part, on your note sheet.
57. Layers - new raster layer, and place on this your water mark.
58. Layers - merge - merge all flatten
Save and ready is Scrap in Black.
We are very curious to your development of this tutorial.
This lesson cannot without authorisation of EM design on another
forum or website' s be placed. This lesson has been made on
12 november 2006 A type equal lesson relies purely on contingency


Geen opmerkingen:
Een reactie posten