
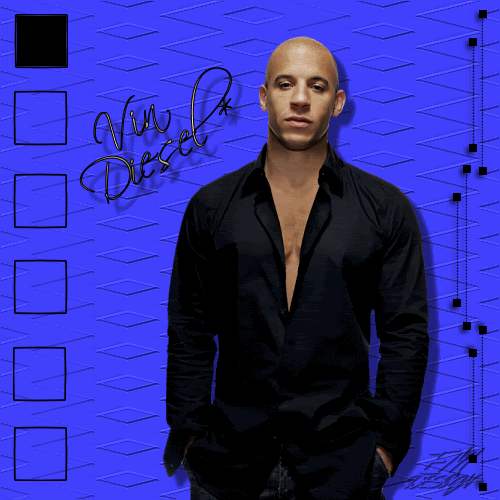
Click on the image for truth size
Needed:
Tube (max. 470 pixels high)
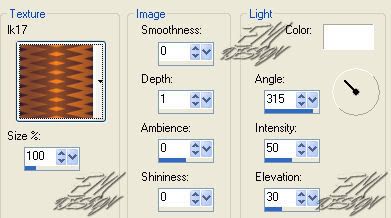
Texture:
L&K 17
Selection:
EM Design 135
Font:
Sciptina
Brush:
hbg 2003_lines3 002
Pattern:
Goud patroon
Download material
1. Open a new image 500 X 500 transparent
2. Go to the material palette and take two colors, I have chosen for blue as foreground color and black as background color
3. Activate flood fill tool and fill the image with foreground color
4. Effects - texture effects - texture – lk17.
Settings:
5. Effects - edge effects - enhance
6. Layers - new raterlayer
7. Selections - selections load/save - load selection from disk - EM Design 135.
Mark source luminance and replace selection
8. Selections - modify - select selections borders - border width 1 pixel
Mark outsite and anti alias
9. Layers - new rasterlayer
Activate flood fill tool and fill the border with background color
10. Selections - select none
11. Go to the tube
Edit - copy
12. Return to your image
Edit - paste - paste as a new layer
13. Activate move tool and drawer your tube at the correct place
(sse example)
14. Effects - 3D effects – dropshadow
Vertical and horizontal 10 - opacity 50 - blur 5 - color black
15. Layers - new raster layer
16. Activate paint brush - hbg 2003_lines3 002 brush - size 210.
17. Stamp the brush to the right upper part
(see example)
18. Layers - duplicate
19. Image - flip
19. Layers - duplicate.
20. Activate move tool and move these brush between 2 the brushes, which you have placed (see example)
21. Go to the materials palette and chance foreground color in pattern and
search for Goud patroon - angle 359 and scale 120
Turn the foreground pattern with the background color (now is background color foreground and pattern background pattern)
22. Activate text tool - font: Scriptina - size 40, stroke width 1, Mark anti alias aanvinken and create as vector
23. Type your text
24. Layers - convert to rasterlayer
25. Activate deform tool and turn the text something slanting
(sse example)
26. Effects - 3D effects – dropshadow
same settings
27. Go to the layers palette and close raster 2 (click on the eye)
28. Layers - merge - merge visible
29. Layers - arrange - send to bottom
30. Go to the layers palette and open raster 2 and make raster 2 active
31. Activate magic wand - tolerance and feather 0 - mode: add
32. Select the insite of all squares
32. Layers - new raster layer
33. Activate flood fill tool and fill the first square with foreground color
33. Layers - new raster layer
34. Activate flood fill tool and fill the second square with foreground color
34. Repeat point 33 and 34 till all squares has been done
34. Selection - select none
35. Go to the layers palette, close all layer except Merges layer, raster 1 and raster 2 they stay open.
36. Edit - copy merge
36. Open animation shop
37. Edit – paste - as new animation
38. Return to psp
39. Go to the layer palette and close raster 1 and open raster 3
39. Edit - copy merge
41. Return to animation shop
Edit – paste – after current frame
42. Return to psp
43. Go to the layer palette and close raster 3 and open raster 4
43. Edit - copy merge
44. Return to animation shop
Edit – paste – after current frame
45. Return to psp
46. Go to the layers palette and close raster 4 and open raster 5
46. Edit - copy merge
47. Return to animation shop
Edit – paste – after current frame
48. Repeat this to you all squares have used
48 In Animation Shop,
Edit - select all
49 Animation - frame properties - display time 30
save and ready is Vin Diesel
We are very curious to your development of this tutorial.
This lesson cannot without authorisation of EM design on another
forum or website' s be placed. This lesson has been made on
26 november 2006 A type equal lesson relies purely on contingency


Geen opmerkingen:
Een reactie posten