

Click on the image for truth size.
Needed:
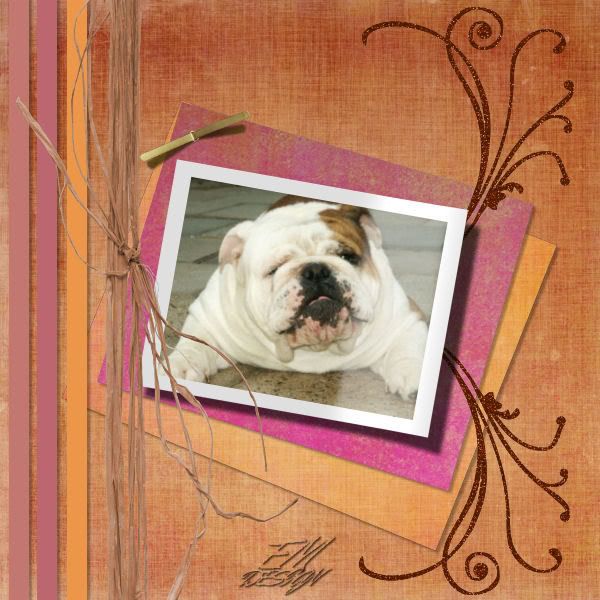
Photo
Template #54 EM Design
6 achtergrond papiertjes ( background papers You use 3 pappers )
Gold Pattern (Goud patroon)
Materiaal
1. Open the template, papers and photo
2. Go to your template
image – resize – 600 x 600 pixels
resize all layer active
3. Go to your layer palette, delete
Url layer, signature layer and delete this layer.
4. Make Backgound layer active in your layers palette
5. Go to a paper which you wants use as background paper
edit - copy
6. Return to your template,
edit - paste - paste as a new layer.
7. Make now Backgound Photo layer active in your layers palette
8. Go now to a another paper,
edit - copy
9. Return to your template,
selections - select all
10. Selections - float
11. Selections - defloat
12. Edit - paste - paste as a new layer.
13. Selections - invert
Press now on delete on your keyboard
14. Selections - Select none
15. Effects - 3D effects - dropshadow,
Horizontal and vertical 3 – Opacity 30 – blur 3 – color black
16. Make now Backgound II Photo layer active in your layers palette
17. Go again to a another paper,
edit - copy
18. Return to your template,
selections - select all
19. Selections - float
20. Selections - defloat
21. Edit - paste - paste as a new layer.
22. Selections - invert
Press now on delete on your keyboard
23. Selections - Select none
24. Effects - 3D effects - dropshadow,
Horizontal and vertical 3 – Opacity 30 – blur 3 – color black
25. Make now Photo here layer active in your layers palette
26. Go to your photo,
edit - copy
27. Return to your template,
selections - select all
28. Selections - float
29. Selections - defloat
30. Selections - modify - expand – 2 pixels
31. Edit - paste - paste as a new layer
32. Reduce the photo to desired size with image – resize,
resize all layer NOT active
33. Selections - invert
Press now on delete on your keyboard
34. Selections - Select none
35. Make now Line layer active in your layers palette
selections - select all
36. Selections - float
37. Selections - defloat
38. Activate floot fill tool, take a color which is appropriate at your photo in your materials palette, and fill the selection.
39. Selections - Select none
40. Effects - 3D effects - dropshadow,
Horizontal and vertical 3 – Opacity 30 – blur 3 – color black
41. Make now Line II layer active in your layers palette
selections - select all
42. Selections - float
43. Selections - defloat
44. Activate floot fill tool, take a nother color in your materials palette, and fill the selection.
45. Selections - Select none
46. Effects - 3D effects - dropshadow,
Horizontal and vertical 3 – Opacity 30 – blur 3 – color black
47. Make now Line III layer active in your layers palette
selections - select all
48. Selections - float
49. Selections - defloat
50. Activate floot fill tool, take a nother color in your materials palette, and fill the selection.
51. Selections - Select none
52. Effects - 3D effects - dropshadow,
Horizontal and vertical 3 – Opacity 30 – blur 3 – color black
53. Make now Rafia layer active in your layers palette
selections - select all
54. Selections - float
55. Selections - defloat
56. Layers – new rasterlayer
57. Activate floot fill tool, take a nother color in your materials palette, and fill the selection.
58. Selections - Select none
59. Go to the layer palette. put the blend mode on color and Opacity on 75 (be possible differences by color)
60. Make now Backward brad layer active in your layers palette
selections - select all
61. Selections - float
62. Selections - defloat
63. Layers – new rasterlayer
64. Go to your materials palette, set forefront color on Goud patroon (gold pattern) Angle 0 and scale 100
65. Activate floot fill tool, fill the selection.
66. Go to your layer palette, set the blend mode on color hard light.
67. Make now Swirl layer active in your layers palette
selections - select all
68. Selections - float
69. Selections - defloat
70. Layers – new rasterlayer
71. Activate floot fill tool, take a nother color in your materials palette, and fill the selection.
72. Selections - Select none
73. Set blend mode on color (legacy) in your layers palette.
74. Make now Swirl II layer active in your layers palette
selections - select all
75. Selections - float
76. Selections - defloat
77. Layers – new rasterlayer
78. Activate floot fill tool, take a nother color in your materials palette, and fill the selection.
79. Selections - Select none
80. Set blend mode on color (legacy) in your layers palette.
81. Layers - new rasterlayer, place here your watermarking
Save as jpg and ready is Rafia
We are very curious to your development of this tutorial.
This lesson cannot without authorisation of EM design on another
forum or website' s be placed. This lesson has been made on
8 september 2008 A type equal lesson relies purely on contingency


Geen opmerkingen:
Een reactie posten